Find out what solar panels cost in your area
There are many reasons why people choose to go solar. Some want to switch to clean and renewable energy. Others like the idea of reducing their reliance on the electricity grid, but the number one reason to go solar is to save money.
Most people go with a full-service solar company that does all the work and planning for them, but if you have the time, the skills, and the DIY spirit, you can install solar panels yourself.
There’s more to it than just attaching the panels to the roof. Depending on how big of an installation you want, it can get quite complicated. In many places, there are engineering and permitting requirements, and even professional certification requirements for incentive eligibility.
Let’s discuss each major advantage and disadvantage of a DIY solar panel installation and break down the design and installation process into six simple steps.
Key takeaways
-
Building solar panels from scratch takes dedication and precision, it is best suited for small-scale projects.
-
DIY solar can cost anywhere from $7,000 to $18,000 before the tax credit.
-
Solar panel kits include all of the components you need, making it easier to build as opposed to doing everything from scratch.
-
If you build your own solar system, you do not get any monetary incentives, warranties, or any support from manufacturers.
-
Working with professional installers is the better option – guaranteeing safe, reliable, and warranted panels for its 25-year lifespan.
How much does it cost to build your own solar panel system?
When you DIY solar, you can do so with either a solar panel kit, or from scratch.
Solar panel kits range in price; a 6kW system can cost anywhere from $7,000 - $18,000 before the 30% federal tax credit. However, this doesn’t include permitting costs or installation, which would be included if you work with an installer.
As of March 2023, the average cost of a 6kW system is about $18,000 before the tax credit is factored in; which would bring the total to $12,600. This cost is relatively higher – but it’s worth having a system you can trust for a lifespan of 25 years.
As for building solar panels from the ground up, the cost of necessary materials, permitting, etc – might vary. Just know that building your system might cost a bit less than a professional job, but in the event that your panels or other equipment don't work, you’re left without any warranties or manufacturer support to lean on – meaning you’re stuck with the bill to fix them.
What are the pros and cons of DIY solar panels?
Although cheaper than going solar with a professional solar company, DIY solar is still a big and costly commitment. You’ll want to figure out whether a DIY solar panel installation is right for you before you’re too heavily invested in the process!
To help you decide if DIY solar is worth it for you, here is a list of the possible pros and cons:
Pros | Cons |
|---|---|
Cost savings | Lots of time and effort |
DIY satisfaction | Risk of roof damage & leaks |
| Physical danger |
| Inability to claim incentives |
| No support for faults or warranty claims |
Advantages of DIY solar installations
Installing solar panels yourself can help save on costs and give you a sense of pride for finishing the project.
Cost savings
A DIY solar panel installation can save homeowners thousands of dollars in upfront installation costs.
The average cost of solar panel installation by a professional solar company is around $2.95 per watt. For a typical 5 kW (5,000 watt) solar panel system, that works out to $14,750.
On the other hand, a 5 kW DIY solar panel kit costs between $1.00–$1.50 per watt. Assuming you perform the entire job by yourself (i.e. no contractors for any of the tasks), the total cost of a 5 kW DIY solar project is between $5,000 and $7,500.
That works out to a potential savings of $7,250 - $9,759 by choosing DIY over a professional solar installation.
The figures above are just averages. There are many variables that can change these numbers for you, such as system size and whether or not you qualify for the solar tax credit (worth 30% of solar energy system costs).
DIY satisfaction
If you’re someone who likes to take on big and challenging DIY projects, then a solar installation might be just what you’re looking for.
You will have to draw on many different skill sets, such as the ability to negotiate municipal processes, financial planning, proficiency with power tools, electrical work, and even tax accounting.
And there are many stages to the solar installation — researching, planning, shopping, permitting, installation, electric wiring, and monitoring.
This is a project that will keep you busy for a while, and if you manage to complete it on your own you will definitely feel a sense of pride in your accomplishment.
Disadvantages of DIY solar installations
While cost savings are nice, the cons of DIY solar installations usually outweigh the pros.
It’s a lot of time and effort
Installing solar yourself can be rewarding — but only if you’re actively seeking a serious DIY challenge.
If, however, your past experience with DIY projects is limited to assembling Scandinavian flatpack furniture, you might want to steer clear of taking on solar. Not only does it require a lot of planning and organizational skills, but it is also a very time-consuming project: from conception to commissioning, a DIY solar installation usually takes between one to four months.
Risk of roof damage or leaks
This is perhaps the biggest financial risk when it comes to a DIY solar installation.
Unless you have a flat roof, your solar installation will involve drilling a large number of holes into your roof. Drilling into the wrong spot on the roof can cause structural damage, while incorrect sealing and flashing can cause roof leakage and/or mold issues.
Another factor to keep in mind is that a DIY solar installation is likely to void the warranty of your roof, so you’ll have to foot the bill for any repairs that may be needed.
Physical danger
Heights and high voltage electricity are two major risks that DIYers are exposed to during a solar installation.
And the physical risks aren’t just restricted to just the installation. If there are any problems over the 25-year life of the panels, it’ll be up to you to get back on the roof to troubleshoot the issue.
Worst of all, if you don’t connect the wiring properly, your rooftop system could catch fire!
No support for faults or warranty claims
You are on your own if there is ever a fault with the equipment.
Of course, you can still contact the manufacturer directly, but it can be difficult to prove a warranty claim. Furthermore, if you perform an improper installation, you can actually void the warranty.
Inability to claim some incentives
Many states offer incentives and rebates that dramatically reduce the cost of going solar.
Some incentives, however, are only available when the installation is completed by a certified solar company. Make sure to check what incentives and rebates are available where you live.
Installation guide: 6 steps for DIY solar panels
Let’s now dive into the 6 steps needed to take your DIY solar panel project from start to finish.
1. Make a DIY plan and design your system
This is the trickiest step in the whole DIY process, especially if you don’t have any prior experience working with energy systems. Consider all the items below before starting your DIY solar project.
A. Decide on your goals
What do you want from your system? Financial savings? Backup power? Independence from the grid?
The goal you’re shooting for will determine the best system type for you, how complex the installation will be, and how much the project will cost.
B. Choose the right solar system type
The next decision is to choose the right solar power system type to match your goal.
All system types have many features in common: they all involve solar panels, inverters, mounts, and wiring.
There are, however, some crucial differences, and they can impact the project’s cost and complexity. Here’s a brief summary of each.
Grid-tie solar panel system: This kind of solar setup uses the grid as a battery through net metering. Grid-tied solar systems require less equipment than other types of systems and thus have the lowest upfront costs. The disadvantage of these systems is that they lack backup power.
Hybrid solar panel system: A hybrid system includes a battery storage solution while maintaining a grid connection. Hybrid systems are more expensive than grid-tied ones, but they offer additional functionality like backup power during a grid failure and time-of-use arbitrage.
Off-grid solar system: Off-grid solar systems operate independently of the grid. Since there’s no grid to fall back on, the solar system needs many panels and a large battery bank to meet the home’s power needs 24/7, 365 days a year — even during winter and/or long stretches of overcast weather. This is the most expensive type of system.
C. Check solar rules and regulations
There is a wide range of rules governing solar installations. They can vary greatly between states, and even between local jurisdictions.
Be aware that some states don’t allow a solar system to be connected to the grid unless the installation was performed by a licensed contractor. If this is the case where you live, you won't be able to install a DIY grid-tied or hybrid solar system.
If DIY is allowed where you live, then you’ll probably need a building permit and a utility permit before you start your installation. This generally involves an onsite inspection by either a structural engineer or a licensed electrician.
Later, once the installation is complete, you’ll need to pass another round of inspections before your system can be activated and connected to the grid.
D. Design the system
This is one of the most complicated parts of the DIY solar panel process. You want your system to take into account all of the following factors:
Your energy needs
Climate and the number of sun hours you’ll see each month
Solar panel orientation
Solar panel angle
Natural efficiency drop
Conversion losses
Shading
Expandability
Battery size and charging (for hybrid and off-grid systems)
Our solar panel calculator accounts for all these factors to show you total system output over each month of the year. It also recommends a system size for your specific home and even shows you which section of your roof you should use for maximum exposure to sunlight. Try it out by entering your zip code below.
If you’re adding batteries for a hybrid or off-grid system, you’ll need to take care to size your battery correctly.
You’ll also need to create an electrical diagram. They’re a required part of your permit applications, and they’ll serve as a blueprint when you physically install your panels.
E. Do the math

Now that you have a system design ready, it’s time to work the numbers, i.e. your estimated costs and savings over the 25-year life of the panels.
Figure out your costs with an online search for solar equipment. The simplest way to do this is to find the price for a complete, all-in-one DIY solar kit that matches your desired system size.
Next, you want to figure out your utility bill savings. The first step is to calculate the annual output of your system (see figures by location here). Multiply that by the cost of electricity where you live and you’ve got a figure for avoided utility costs.
With the cost and savings figure in hand, you can calculate the return on your DIY solar panel project.
Here’s the simple formula: Avoided utility costs (i.e. electric bill savings) - Cost of solar equipment = Your total financial savings.
You can now decide if a DIY solar project is worth it from a financial perspective.
2. Begin the permitting process
You’re ready to get your hands dirty and install some solar panels! But wait — remember those pesky rules and regulations we mentioned in Step 1? We’ll need to review those before we start any work.
Begin by listing out all permit processes required by the state, your utility, and your authority having jurisdiction (AHJ). You’ll probably need to apply for a building and utility permit before you start any work. This will often involve an inspection by either an electrician or a structural engineer, or both.
Make sure to follow all requirements to ensure that your installation is code-compliant and legal.
3. Choose a supplier and buy your equipment
Here’s is a brief list of all the equipment you’ll need for your solar setup:
Solar panels
Solar inverter
Mounting and racking equipment
Wiring and general electrical supplies
Battery system (for hybrid and off-grid systems)
Charge controller (required for some battery systems)
The easiest thing to do is find a complete DIY solar panel kit that includes all the equipment you need. If not, you’ll have the challenging task of shortlisting individual components and then figuring out which parts can work together.
When you’re comparing kits, we encourage you to check product reviews on SolarReviews to make sure that you’re buying from reputable brands.
As for the supplier, choose one that offers long warranties and great after-sales support. In fact, I would prioritize both these factors over price — you will interface with the supplier a lot for technical support, and possibly for warranty support, as well.
More: Compare and purchase the best solar panel kits
4. Install the solar panel system
At this point, you should have successfully applied for all necessary permits and approvals, and accepted delivery of your solar equipment. It’s now time to install the panels!
The actual specifics of the installation will depend on what system type and equipment you’ve decided upon.
The process I’m describing below is for a grid-tied system that uses microinverters for the direct current (DC) to alternating current (AC) power conversion. Installing the solar system can be a complicated process – the steps below highlight the process in order to minimize any bumps in the road.
Step 1: Install solar panel racking and mounting
Use a chalk line to measure and mark out exactly where on your roof the racking system will be installed.
Next, look for solid bits of the roof to drill into for the installation of lag bolts. You should consider using a stud finder with AC current detection to ensure you’re not drilling through a power line.
Caulk the holes and install flashing to create a waterproof seal before you screw the lag bolts in. Once the lag bolts are all ready, you can install L-feet and then lock the rails onto them.
The method I’ve described here is for a system using roof mounts. If your roof isn’t suitable for an installation, you may want to consider ground mounts instead.
Step 2: Connect the microinverters
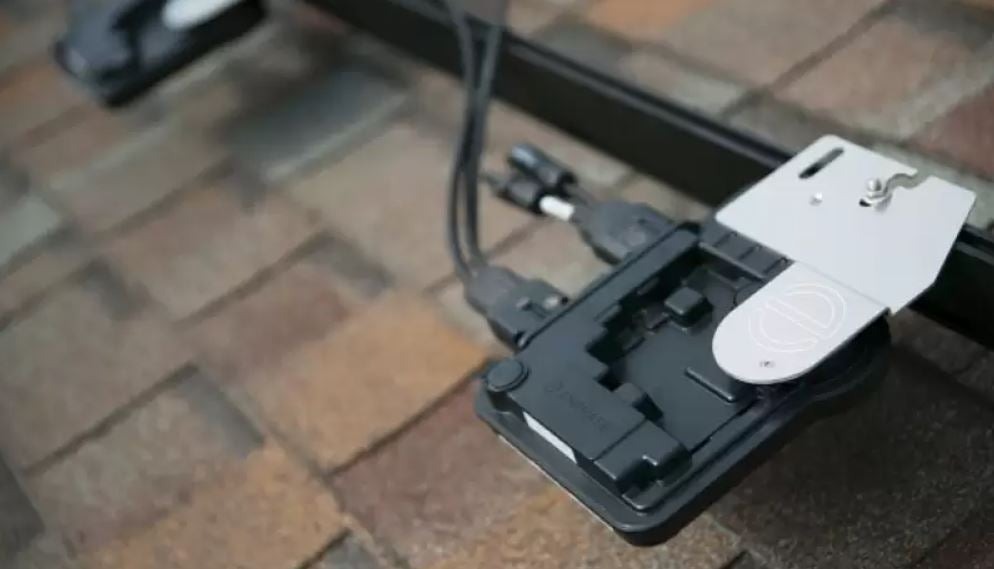
Microinverters attached to a rail. Later, each solar panel will be connected to one before it is mounted. Image source: Enphase
On to the microinverters. These are little boxes that will modulate the output of each panel. You’ll connect them to the rails using the provided bolts. Each box will have a positive and negative wire coming out of it, which you will connect together to form a series connection for each array.
Step 3: Connect grounding wire
Connect copper wire of an appropriate gauge across the rails as grounding. This is an important safety precaution and will help dissipate any anomalies caused by a lightning strike or a fault.
Step 4: Install roof junction box
You’ll need to drill a hole in the roof to install a junction box. If you have more than one solar array, you will run the trunk cable from each into the junction box. This will allow you to channel the power from the solar panels to your house.
Step 5: Install the solar panels
It’s now time to haul the panels onto the roof. Each module is about 65 inches by 39 inches, which can be an awkward size for one person to handle on their own. Consider getting someone to assist you with this part, especially if your roof is steep. And make sure to use a harness while you’re up there!
It’s now time to attach the solar panels to the mounting rail. Before laying them down flat, get the wiring in order. Each solar panel has a negative and positive DC wire attached to it; clip or zip-tie them to the panel so that they don’t touch the roof. Once the wires are neatly tucked away, connect the wires to the microinverters
Next, insert the provided mid-clamps into the railing on each side of the solar panel to hold it in place. Use end-clamps solar panels at the end of the rail; they keep the panel in place but are less visible from the ground.
Step 6: Home run connection
With the solar panels ready, it's time to connect them to the house. For this you will need to install:
A conduit
An external junction box
An emergency disconnect box
The conduit will carry the wires from the roof junction box down to the external junction box. The junction box, in turn, connects to an emergency disconnect. This is a safety feature that allows you to quickly shut off your own solar panel system, and is a required feature in many jurisdictions.
The external junction box and emergency disconnect box should be weatherproof and installed in an area that is both easily accessible and allows easy connection to the home’s main electrical panel.
From the emergency disconnect, the wires are passed through to the home’s main electrical panel.
Your solar panel system is now ready, but you’ll have to jump through a few more hoops before you can actually switch it on. That's where the next part of the process comes in.
5. Final inspection and interconnection to the grid
Once your installation is complete, schedule an inspection with the local AHJ. The inspector will assess if the system is compliant with local ordinances, and whether the design matches those laid out in your plans.
The system will also need to pass an electrical inspection to ensure that it is code-compliant.
Once you’ve passed the inspection, you can apply for interconnection with the grid. The utility will either install a second meter, or replace your existing one with a bi-directional (or net) meter. The bi-directional meter can record your home’s power exports to the grid so that you can receive credits on your power bill.
6. Switch on your system
If your system has now met all state, local, and utility company requirements, you can now commission it. Check whether your solar system is functioning by firing up your solar monitoring app — almost every inverter comes with one these days.
Does the app show the system is performing as expected? If yes, then congratulations! It was hard work, but you’re finally done.
DIY or not, solar power is highly rewarding
If you’ve read through this very lengthy blog post, kudos. It means you’re serious about going solar — a journey I’m sure you’ll find highly rewarding. Solar panels will reduce your electric bills, cut your carbon emissions, and increase your energy independence.
If you have a lot of time on your hands and the skills to pull it off, you might be able to go the DIY route.
However, if a DIY solar installation seems like more than you can handle, then fret not: there are many highly-rated solar installers that can do the work for you. While solar system installations are expensive, having an installer's expertise and hands-on experience can save you the frustration and risks. If you aren’t sure where to start, check out our list of the 100 best installers in the U.S. for some suggestions.
DIY or not, we encourage you to check out our solar calculator, as it will recommend a system for you that offers 100% offset of your utility bills.
Best of luck on your solar journey!
Zeeshan is a solar journalist who has long been passionate about climate issues and developed a deep interest in solar power after witnessing its successful adoption in Australia. He has previously worked as a journalist for a major news organization, covering energy, climate, and environmental stories, among other topics. He also served as an organizer for the Pakistan Youth Climate Network, an advocacy group aimed at raising climate awareness...
Learn more about Zeeshan Hyder